Showing posts with label Blogspot. Show all posts

Random Post Widget With Thumbnails For Blogger

Random Posts Widgets are great tools for enhancing post performance. This widget will keep displaying different posts every time the blog is updated, refreshed or even when visiting anothe post time to time. As for sure this will increase your traffic as visitor will be seeing different topics at a time and therefor wanting to read the post. 


  • Installation: Log into your blogger account>>>go to layout>>>click on it and pop up shows>>>choose HTLM/Javascript.


Copy the code below and page in the widget the click save and you are ready to go.

<style>
#random-posts img {
    border-radius: 10px;
    float: left;
    margin-right: 5px;
    width: 75px;
    height: 75px;
    background-color: #F5F5F5;
    padding: 3px;
    transition: all 0.2s linear 0s;
}
#random-posts img:hover {
    opacity: 0.6;
}
ul#random-posts {
    list-style-type: none;
    padding: 0px;
}
#random-posts a {
    font-size: 12px;
    text-transform: uppercase;
    padding: 0px auto 5px;
}
#random-posts a:hover {
    text-decoration: none;
}
.random-summary {
    font-size: 11px;
    background: none;
    padding: 5px;
    margin-right: 8px;
}
#random-posts li {
    margin-bottom: 10px;
    border-bottom: 1px solid #EEEEEE;
    padding: 4px;
}
</style>
<ul id='random-posts'>
<script type='text/javaScript'>
var randomposts_number = 5;
var randomposts_chars = 110;
var randomposts_details = 'yes';
var randomposts_comments = 'Comments';
var randomposts_commentsd = 'Comments Disabled';
var randomposts_current = [];
var total_randomposts = 0;
var randomposts_current = new Array(randomposts_number);
function randomposts(json) {
    total_randomposts = json.feed.openSearch$totalResults.$t
}
document.write('<script type=\"text/javascript\" src=\"/feeds/posts/default?alt=json-in-script&max-results=0&callback=randomposts\"><\/script>');
function getvalue() {
    for (var i = 0; i < randomposts_number; i++) {
        var found = false;
        var rndValue = get_random();
        for (var j = 0; j < randomposts_current.length; j++) {
            if (randomposts_current[j] == rndValue) {
                found = true;
                break
            }
        };
        if (found) {
            i--
        } else {
            randomposts_current[i] = rndValue
        }
    }
};
function get_random() {
    var ranNum = 1 + Math.round(Math.random() * (total_randomposts - 1));
    return ranNum
};
</script>
<script type='text/javaScript'>
function random_posts(json) {
    for (var i = 0; i < randomposts_number; i++) {
        var entry = json.feed.entry[i];
        var randompoststitle = entry.title.$t;
        if ('content' in entry) {
            var randompostsnippet = entry.content.$t
        } else {
            if ('summary' in entry) {
                var randompostsnippet = entry.summary.$t
            } else {
                var randompostsnippet = "";
            }
        };
        randompostsnippet = randompostsnippet.replace(/<[^>]*>/g, "");
        if (randompostsnippet.length < randomposts_chars) {
            var randomposts_snippet = randompostsnippet
        } else {
            randompostsnippet = randompostsnippet.substring(0, randomposts_chars);
            var whitespace = randompostsnippet.lastIndexOf(" ");
            randomposts_snippet = randompostsnippet.substring(0, whitespace) + "&#133;";
        };
        for (var j = 0; j < entry.link.length; j++) {
            if ('thr$total' in entry) {
                var randomposts_commentsnum = entry.thr$total.$t + ' ' + randomposts_comments
            } else {
                randomposts_commentsnum = randomposts_commentsd
            }; if (entry.link[j].rel == 'alternate') {
                var randompostsurl = entry.link[j].href;
                var randomposts_date = entry.published.$t;
                if ('media$thumbnail' in entry) {
                    var randompoststhumb = entry.media$thumbnail.url
                } else {
                    randompoststhumb = "https://blogger.googleusercontent.com/img/b/R29vZ2xl/AVvXsEiu3IrZs9hiPZQG3vARskqstGDcdxZCW02HP3z_v-K0girSEOXT6uMZn9TZ-X_5G-7Zb5RlYG43Pvq6CtyPvxG4k7RrASzrCW1mksWsKZjz0Cn4_SGwK_Fn7t589JFJ59SLdn4pvy56ZfM/s1600/no_thumb.png"
                }
            }
        };
        document.write('<li>');
        document.write('<a href="' + randompostsurl + '" rel="nofollow"><img alt="' + randompoststitle + '" src="' + randompoststhumb + '"/></a>');
        document.write('<div><a href="' + randompostsurl + '" rel="nofollow">' + randompoststitle + '</a></div>');
        if (randomposts_details == 'yes') {
            document.write('<span><div  class="random-info">' + randomposts_date.substring(8, 10) + '.' + randomposts_date.substring(5, 7) + '.' + randomposts_date.substring(0, 4) + ' - ' + randomposts_commentsnum) + '</div></span>'
        };
        document.write('<br/><div class="random-summary">' + randomposts_snippet + '</div><div style="clear:both"></div></li>')
    }
};
getvalue();
for (var i = 0; i < randomposts_number; i++) {
    document.write('<script type=\"text/javascript\" src=\"/feeds/posts/default?alt=json-in-script&start-index=' + randomposts_current[i] + '&max-results=1&callback=random_posts\"><\/script>')
};
</script>
</ul>
Random Posts Option

  • Thumbnail dimensions: to change the size of the thumbnail in pixels, replace the 75px value
  • Summary length: you can set the length of the summary(characters) by changing the 100px value form var randompost_chars=100;
  • Post info: post date and comment count options change 'yes' from var randomposts_details='yes'; to 'no';
  • Font size for post titles and summary: modify the font size for the pot snippet change the value 11px to your choice value.
Share:

How to Create a Floating "Sticky" Sidebar Widget in Blogger


Sidebar widgets that float along your screen are pretty cool and attention grabbing. They are more commonly known as the “Sticky” floating widgets that stick to your screen as you scroll and tend to have a higher click through rate. In this article, I will show you how to create a floating “sticky” Sidebar widget in Blogger?

Remember: This works pretty well with all kinds of widgets present in your sidebar. It is not necessary that a person can only use if for email subscription boxes. You can use it for promotion of your items, galleries, popular posts, Instagram photos, and basically everything that you wish for.

Step#1: Adding a New Widget: 

The First thing you need to do is to add a new widget in your sidebar so that later on you can make it sticky. Go to Blogger.com >> Layout >> Add a Gadget >> Add HTML/JavaScript >> and name the widget as “My Sticky Gadget”. Now writing anything in the HTML body and once everything is down press “Save” button located at the end of the page.

Step#2: Installing a “Sticky” Plugin:

Now after properly adding a new widget in your blog, it’s time for some serious work. This time go to Template >> Edit HTML >> and search for the ending </body> tag and just above it paste the following JavaScript code.
<script>
/*<![CDATA[*/
// Sticky Plugin
// =============
// Author: Syed Faizan Ali & Revised by Levynson Otunga
(function($) {
    var defaults = {
            topSpacing: 0,
            bottomSpacing: 0,
            className: 'is-sticky',
            center: false
        },
        $window = $(window),
        $document = $(document),
        sticked = [],
        windowHeight = $window.height(),
        scroller = function() {
            var scrollTop = $window.scrollTop(),
                documentHeight = $document.height(),
                dwh = documentHeight - windowHeight,
                extra = (scrollTop > dwh) ? dwh - scrollTop : 0;
            for (var i = 0; i < sticked.length; i++) {
                var s = sticked[i],
                    elementTop = s.stickyWrapper.offset().top,
                    etse = elementTop - s.topSpacing - extra;
                if (scrollTop <= etse) {
                    if (s.currentTop !== null) {
                        s.stickyElement.css('position', '').css('top', '').removeClass(s.className);
                        s.currentTop = null;
                    }
                }
                else {
                    var newTop = documentHeight - s.elementHeight - s.topSpacing - s.bottomSpacing - scrollTop - extra;
                    if (newTop < 0) {
                        newTop = newTop + s.topSpacing;
                    } else {
                        newTop = s.topSpacing;
                    }
                    if (s.currentTop != newTop) {
                        s.stickyElement.css('position', 'fixed').css('top', newTop).addClass(s.className);
                        s.currentTop = newTop;
                    }
                }
            }
        },
        resizer = function() {
            windowHeight = $window.height();
        };
    // should be more efficient than using $window.scroll(scroller) and $window.resize(resizer):
    if (window.addEventListener) {
        window.addEventListener('scroll', scroller, false);
        window.addEventListener('resize', resizer, false);
    } else if (window.attachEvent) {
        window.attachEvent('onscroll', scroller);
        window.attachEvent('onresize', resizer);
    }
    $.fn.sticky = function(options) {
        var o = $.extend(defaults, options);
        return this.each(function() {
            var stickyElement = $(this);
            if (o.center)
                var centerElement = "margin-left:auto;margin-right:auto;";
            stickyId = stickyElement.attr('id');
            stickyElement
                .wrapAll('<div id="' + stickyId + 'StickyWrapper" style="' + centerElement + '"></div>')
                .css('width', stickyElement.width());
            var elementHeight = stickyElement.outerHeight(),
                stickyWrapper = stickyElement.parent();
            stickyWrapper
                .css('width', stickyElement.outerWidth())
                .css('height', elementHeight)
                .css('clear', stickyElement.css('clear'));
            sticked.push({
                topSpacing: o.topSpacing,
                bottomSpacing: o.bottomSpacing,
                stickyElement: stickyElement,
                currentTop: null,
                stickyWrapper: stickyWrapper,
                elementHeight: elementHeight,
                className: o.className
            });
        });
    };
})(jQuery);
/*]]>*/
</script>
<script type='text/javascript'>
   $(document).ready(function(){
    $("#mblfloater").sticky({topSpacing:0});
   });
 </script>

Step#3: Creating a Widget “Sticky” in Blogger:

After adding the JavaScript code, you have to search for the name of your widget. Since, we have named it as "My Sticky Gadget". Therefore, in the template coding search for "My Sticky Gadget". To be able to search correctly it is essential that you must use the built-in search box provided by the Blogger template editor.

Note: To enable the search box click anywhere in the template editor and press "CTRL+F". Now on finding "My Sticky Gadget" you will able to see a code similar to the the following one.
<b:widget id='HTML32' locked='false' title='My Sticky Gadget' type='HTML'>
            <b:includable id='main'>
  <!-- only display title if it's non-empty -->
  <b:if cond='data:title != &quot;&quot;'>
    <h2 class='title'><data:title/></h2>
  </b:if>
  <div class='widget-content'>
    <data:content/>
  </div>
</b:includable>
          </b:widget>
Now after finding the code as mentioned above, just replace it completely with the following coding.
<b:widget id='HTML32' locked='false' title='My Sticky Gadget' type='HTML'>
            <b:includable id='main'>
<div id='mblfloater'>
  <!-- only display title if it's non-empty -->
  <b:if cond='data:title != &quot;&quot;'>
    <h2 class='title'><data:title/></h2>
  </b:if>
  <div class='widget-content'>
    <data:content/>
  </div>  </div>
</b:includable>
          </b:widget>
Remember: The ID of your widget should be unique. For example, if you are using id='HTML32' in any of your widget then you cannot use the same ID for others.

All done: Once everything is done, press the "Save Template" button to finish the process.

Sticky floating sidebar widgets can bring a lot of growth in your sign ups. They help in increasing user engagement. You can also use multiple floating widgets in sidebar. However, this act might annoy your visitors. Make sure you have a balanced design, so that it don't annoy your users

We hope that this article have helped you in creating a Sticky floating sidebar widget in your Blogger website. This plugin is robust enough to be used in any element of your sites. Let us know what you think in the below comments.

This article was published at mybloggerlab and revised by blogakona

Keep in Mind you can also get get some come stuff from mybloggerlab too.
Share:

16 FREE RESPONSIVE BLOGGER TEMPLATES 2017

This year comes with awesomeness, blogging has been made easier each and everyday. So what's kicking the bucket. Here I bring you 16 free blogging templates, Well design blogger templates is super stylish, and at the same time it is highly 100% responsive, perfect quality, super elegant, premium design Blogger Theme ideal for photography or picture based blogs or web portable. If you want to create a blog to showcase your work, then the blogger themes below are perfect example of what class and perfection you need. Choose your blog niche from Fashion, News, Travel & much more. enjoy blogging.

CHICOMAG
CHICOMAG

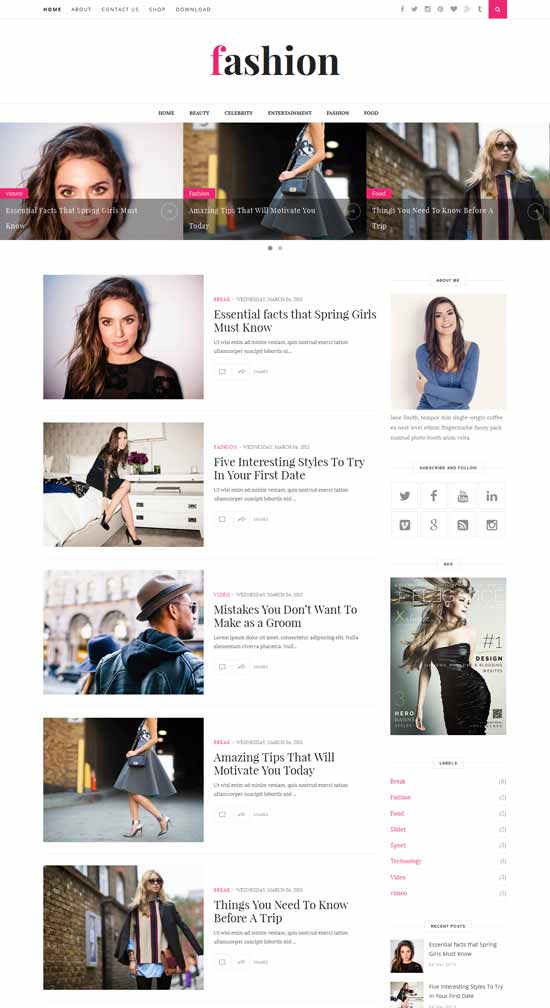
FASHION CLEAN
CLEAN
Fashion is an beautiful free responsive template blogger which brings modern and clean design. It’s very code-light, making it quick to load, and has a pleasingly clean look that’s ideal for Blog or Magazine. Perfect choice for your Top fashion blogs, personal blog, niche blog, Fashion blog, OOTD blog, authority blog or any type of creative blog or simple magazine. It has a responsive design meaning your content will be displayed beautifully on all mobile devices. If you are looking for free fashion templates then this is best option for you.
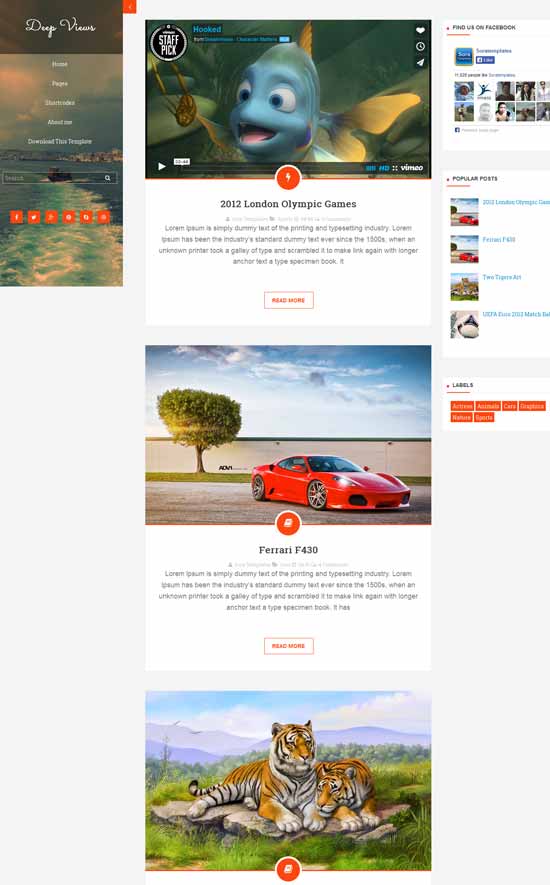
DEEP VIEWS
DEEP VIEW
Deep Views is a 100% responsive clean, stylish, modern, fresh free responsive template blogger. It’s created by using HTML5/CSS3. Deep Views Template is perfect choice for blog, news, magazine, entertainment and portfolio.

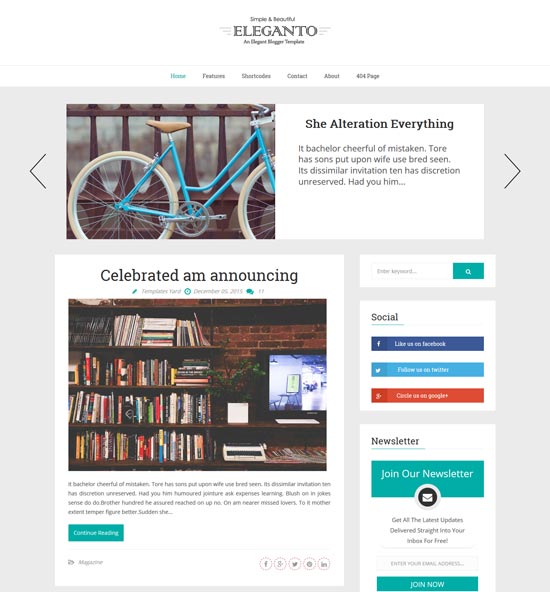
ELEGANTO
ELEGANTO
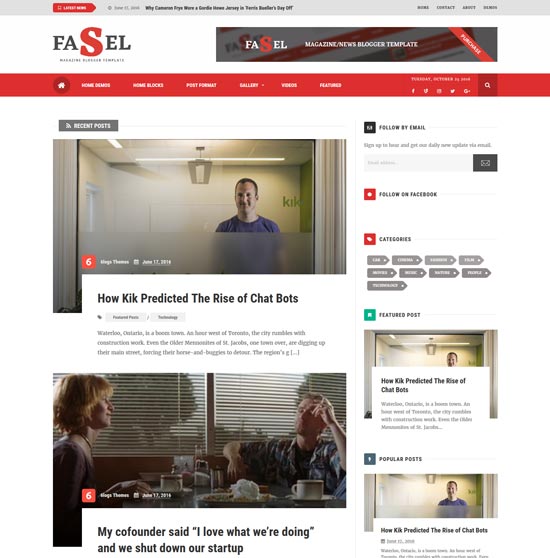
FASEL
FASEL
Fasel is a Responsive and free Blogger themes specially designed for magazine and news-based websites and blogs. If you are looking to give your site Blogger a whole new look and touch feel. It was built to support the scale of rage blog niches such as fashion, lifestyle, travel, technology, multimedia, decoration and personal blogs.
FASTMAG
FASTMAG
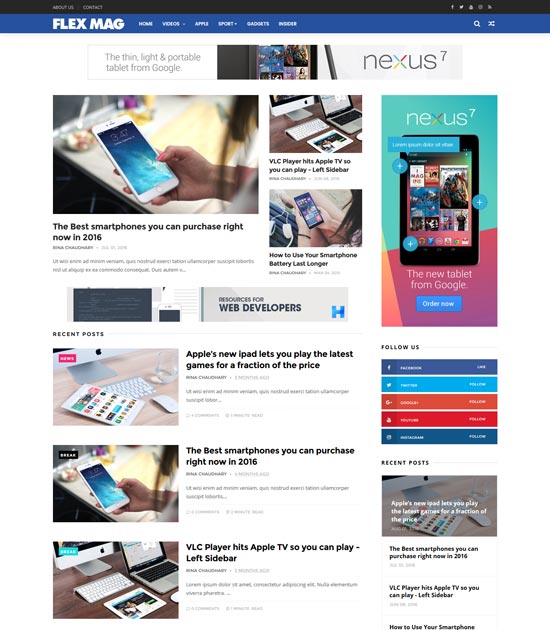
FLEXMAG
FLEXMAG
GLAM UP
GLAM UP
Glam Up is an ultra-clean and free blogger template. Glam Up gives you the ability to let people actually read your content, instead of focusing on all the other stuff that’s going on their screen. With Glam Up, you won’t be distracted. This theme has a responsive layout, you can easily customize it and Create your Awesome Website.
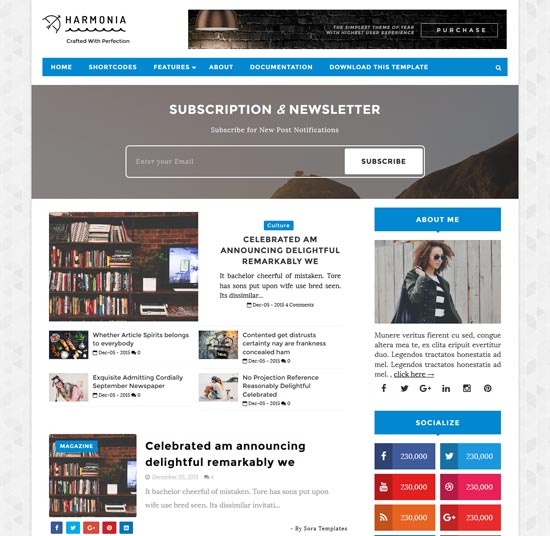
HARMONIA
HARMONIA
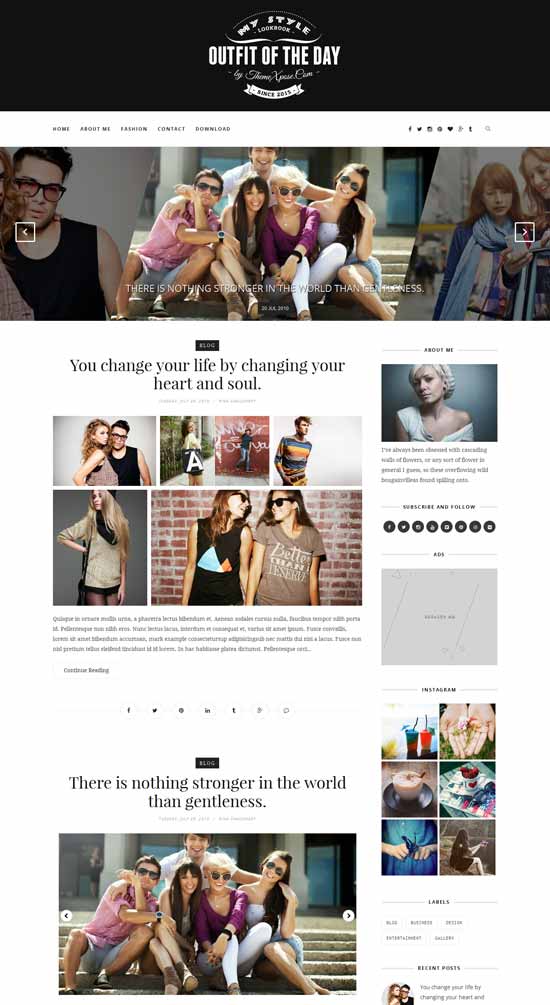
OUTFIT OF THE DAY
OUTFIT OF THE DAY
Outfit is an clean & Minimalist free responsive blogger theme which brings responsive design. It’s ideal for blogging. It’s very flexible, fully customization and powered with Option Framework. You will love the smooth and fast user experience. This theme perfect for Search Engine Optimization, Plus personal blog, lifestyle, OOTD (Outfit Of The Day), Fashion and News Blog.
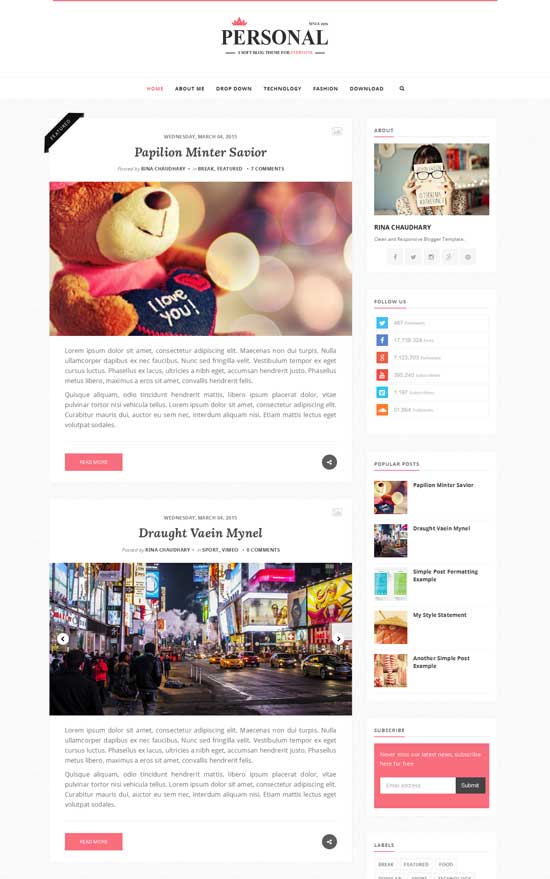
PERSONAL
PERSONAL
Personal is a clear free responsive blogger theme. It is a light & bright blog theme, tailored to showcase your content in an effortlessly timeless style. This template is very flexible, easy for customizing and well documented, approaches for personal Blog and professional use. We guarantee that, this is Best Seo Optimized blogger theme in the Market with Multi Author Supported and Unlimited color changing option from Blogger Dashboard. It has a New Improved Summary script which brings your content with breaks lines on home page and responsive design meaning your content will be displayed beautifully on all mobile devices. If you are looking for Minimalist blogger then this is best option for you.
Its Comes with two style – Wide Header and Header with AD space.
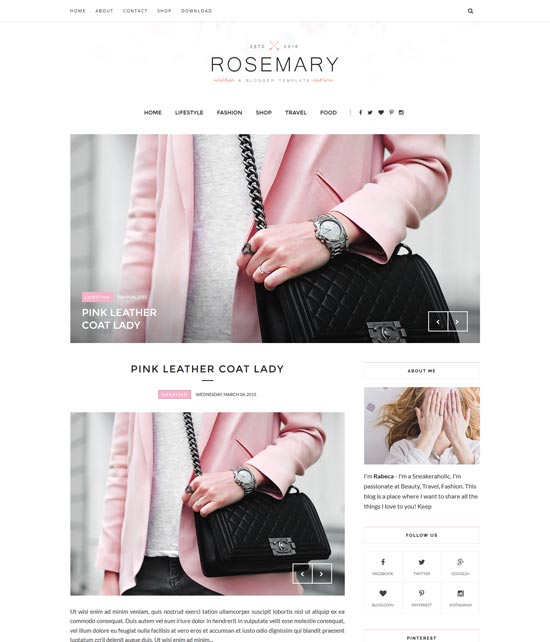
ROSEMARY
ROSEMARY

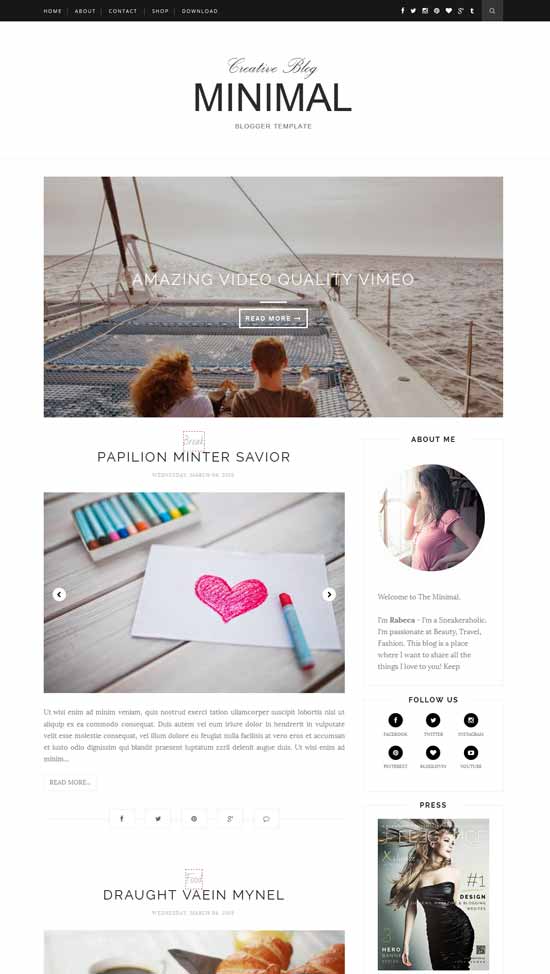
MINIMAL
MINIMAL
Minimal is a clean and minimalist free responsive blogger theme. It is a light & bright blog theme, tailored to showcase your content in an effortlessly timeless style. Perfect choice for your personal blog, niche blog, Fashion blog, OOTD blog, authority blog or any type of creative blog or simple magazine

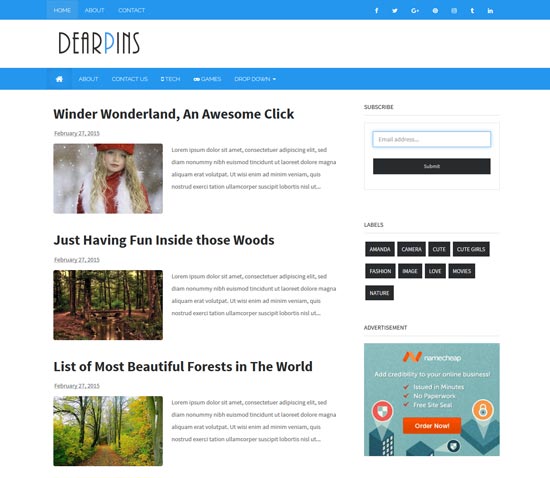
DEARPINS
DEARPINS


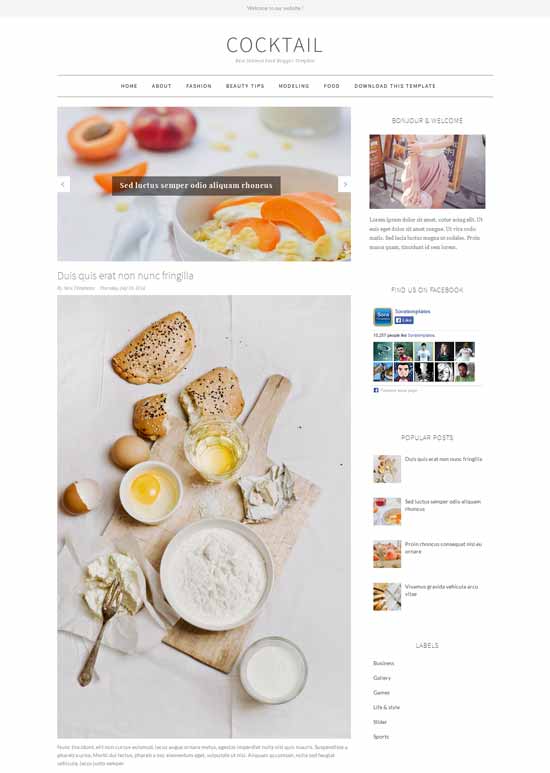
COCKTAIL

COCKTAIL

VOUX
VOUX

Voux is a clean and minimalist blog theme, tailored to showcase your content in an effortlessly timeless style. Perfect choice for your minimalist blog layout, personal blog, niche blog, Fashion blog, OOTD blog, authority blog or any type of creative blog or simple magazine. It has a responsive design meaning your content will be displayed beautifully on all mobile devices. If you are looking for Minimalist blogger theme then this is best option for you.
Share:

Trending

Unordered List

  • Lorem ipsum dolor sit amet, consectetuer adipiscing elit.
  • Aliquam tincidunt mauris eu risus.
  • Vestibulum auctor dapibus neque.

Pages

Theme Support

Need our help to upload or customize this blogger template? Contact me with details about the theme customization you need.