How To Installing Responsive Slider Recent Post


Installing Responsive Slider Recent Post - Well this time I will share about how to install a recent post that has been responsive slider.

Immediately, the way it is applied.

1. Log in to your blog> Template> Edit HTML Then copy and paste the code below just before or

]]></b:skin></style>

/* CSS Responsive Slider Recent Post */
#featuredpost {margin:15px auto;}
#slides *{-moz-box-sizing:border-box;-webkit-box-sizing:border-box;box-sizing:border-box}
#slides ul,#slides li{padding:0;margin:0;list-style:none;position:relative}
#slides ul{height:320px}
#slides li{width:50%;height:100%;position:absolute;display:none}
#slides li:nth-child(1), #slides li:nth-child(2), #slides li:nth-child(3), #slides li:nth-child(4), #slides li:nth-child(5){display:block}
#slides li:nth-child(1){left:0;top:0}
#slides li:nth-child(2){left:50%;width:25%;height:50%}
#slides li:nth-child(3){left:75%;width:25%;height:50%}
#slides li:nth-child(4){left:50%;top:50%;width:25%;height:50%}
#slides li:nth-child(5){left:75%;top:50%;width:25%;height:50%}
#slides li:nth-child(1) h4 {overflow:hidden;font-size:25px;bottom:0;color:#fafafa;width:100%;
padding:10px 10px 10px 90px;text-align:left;text-transform:uppercase;background:rgba(0,0,0,0.3);
height:90px;font-family:&#39;Oswald&#39;;text-shadow:2px 2px 0 rgba(0,0,0,0.2);line-height:32px;left:0;}
#slides li:nth-child(1) .label_text {font-size:30px;display:block;bottom:10px;left:10px;
padding:0;font-family:&#39;Oswald&#39;;box-shadow:5px 3px 0 rgba(0,0,0,0.2);}
#slides li:nth-child(1) span.dd {display:block;font-size:30px;padding:12px 15px;
background:#ff6553;margin:0;}
#slides li:nth-child(1) span.dm {display:block;font-size:14px;background:#333;color:#fff;
padding:5px 21px;text-transform:uppercase;margin:0;}
#slides li:nth-child(1) span.dy, #slides li:nth-child(1) span.autname{display:none;}
#slides a{display:block;width:100%;height:100%;overflow:hidden}
#slides img{display:block;width:100%;height:auto;border:0;padding:0;background-color:#333;-moz-transform:scale(1.0) rotate(0);-webkit-transform:scale(1.0) rotate(0);-ms-transform:scale(1.0) rotate(0);transform:scale(1.0) rotate(0);transition:all 0.6s linear;}
#slides li a:hover img {-moz-transform:scale(1.1) rotate(1deg);-webkit-transform:scale(1.1) rotate(1deg);-ms-transform:scale(1.1) rotate(1deg);transform:scale(1.1) rotate(1deg);transition:all 0.3s linear;}
#slides .overlayx{width:100%;height:100%;position:absolute;z-index:2;background-image:url(http://2.bp.blogspot.com/-0haO2Mfkjjk/VDgZww2tfEI/AAAAAAAAHAk/zhu3INYSkHA/s1600/fade.png);background-position:50% 40%;background-repeat:repeat-x;}
#slides h4{position:absolute;bottom:40px;margin:0;font-size:13px;font-family:&#39;Oswald&#39;;
left:10px;padding:5px 10px;color:#f9f9f9;z-index:3;line-height:20px;font-weight:normal;
background:rgba(41,41,41,0.7);text-align:left;text-transform:uppercase;margin-right:10px;}
#slides .label_text{font-size:12px;color:#fff;bottom:10px;z-index:3;left:10px;
position:absolute;background:rgba(255,101,83,0.8);padding:3px 6px;font-family:&#39;Oswald&#39;;
text-transform:uppercase;}
#slides li:nth-child(2) .autname,#slides li:nth-child(3) .autname,#slides li:nth-child(4) .autname,#slides li:nth-child(5) .autname{display:none;}
#slides .overlayx,#slides li{transition:all .4s ease-in-out}
#slides li:nth-child(1) .overlayx{display:none;}
#slides li:hover .overlayx{opacity:0.1}
@media only screen and (max-width:800px){
#slides li:nth-child(1) h4 {font-size:18px;line-height:24px;}}
@media only screen and (max-width:600px){
#slides ul{height:600px}
#slides li:nth-child(1){width:100%;height:50%}
#slides li:nth-child(2){top:50%;height:25%;left:0;width:50%}
#slides li:nth-child(3){left:50%;top:50%;width:50%;height:25%}
#slides li:nth-child(4){left:0;top:75%;height:25%;width:100%}
#slides li:nth-child(5){display:none;}}
@media only screen and (max-width:480px){#slides li:nth-child(1) h4 {font-size:13px;line-height:16px;}}
In the above CSS I used the font Oswald, please change and adjust to the theme of your blog.

2. Copy and paste the code below just above

</body>
<script type="text/javascript" src="https://arlina-design.googlecode.com/svn/slider-post.js"></script>
<script type='text/javascript'>
//<![CDATA[
$(document).ready(function () {
FeaturedPost({
blogURL:"URL-BLOG-URL",
MaxPost:8,
idcontaint:"#featuredpost",
ImageSize:500,
interval:10000,
autoplay:true,
tagName:false
});
});
//]]></script>
Replace URL-BLOG-URL with your blog url.

3. Copy and paste the code below wherever free.
<div id="featuredpost"></div>
4. . Finally save the template and view the results.

If you want to bring up the slider is just a recent post on the main page only, please wrap HTML code with a special conditional tag main page.
<b:if cond='data:blog.url == data:blog.homepageUrl'>
<div id="featuredpost"></div>
</b:if>
Learn more about the application of conditional tags You can see here 

Some function Conditional Tags In Widgets

And if anyone feels difficulties with its implementation, here I've been providing practical version. You can simply copy all the code below into the Layout> Add Gadget> HTML / JavaScript and paste all the code there Save
<b:if cond='data:blog.url == data:blog.homepageUrl'>
<div id="featuredpost"></div>
</b:if>
Learn more about the application of conditional tags You can see here.
Some function Conditional Tags In Widgets 
And if anyone feels difficulties with its implementation, here I've been providing practical version.
You can simply copy all the code below into the Layout> Add Gadget> HTML / JavaScript and paste all the code there> Save
<style>
/* CSS Slider Recent Post */
#slides *{-moz-box-sizing:border-box;-webkit-box-sizing:border-box;box-sizing:border-box}
#slides ul,#slides li{padding:0;margin:0;list-style:none;position:relative}
#slides ul{height:320px}
#slides li{width:50%;height:100%;position:absolute;display:none}
#slides li:nth-child(1), #slides li:nth-child(2), #slides li:nth-child(3), #slides li:nth-child(4), #slides li:nth-child(5){display:block}
#slides li:nth-child(1){left:0;top:0}
#slides li:nth-child(2){left:50%;width:25%;height:50%}
#slides li:nth-child(3){left:75%;width:25%;height:50%}
#slides li:nth-child(4){left:50%;top:50%;width:25%;height:50%}
#slides li:nth-child(5){left:75%;top:50%;width:25%;height:50%}
#slides li:nth-child(1) h4 {overflow:hidden;font-size:25px;bottom:0;color:#fafafa;width:100%;
padding:10px 10px 10px 90px;text-align:left;text-transform:uppercase;background:rgba(0,0,0,0.3);
height:90px;font-family:'Oswald';text-shadow:2px 2px 0 rgba(0,0,0,0.2);line-height:32px;left:0;}
#slides li:nth-child(1) .label_text {font-size:30px;display:block;bottom:10px;left:10px;
padding:0;font-family:'Oswald';box-shadow:5px 3px 0 rgba(0,0,0,0.2);}
#slides li:nth-child(1) span.dd {display:block;font-size:30px;padding:12px 15px;
background:#ff6553;margin:0;}
#slides li:nth-child(1) span.dm {display:block;font-size:14px;background:#333;color:#fff;
padding:5px 21px;text-transform:uppercase;margin:0;}
#slides li:nth-child(1) span.dy, #slides li:nth-child(1) span.autname{display:none;}
#slides a{display:block;width:100%;height:100%;overflow:hidden}
#slides img{display:block;width:100%;height:auto;border:0;padding:0;background-color:#333;-moz-transform:scale(1.0) rotate(0);-webkit-transform:scale(1.0) rotate(0);-ms-transform:scale(1.0) rotate(0);transform:scale(1.0) rotate(0);transition:all 0.6s linear;}
#slides li a:hover img {-moz-transform:scale(1.1) rotate(1deg);-webkit-transform:scale(1.1) rotate(1deg);-ms-transform:scale(1.1) rotate(1deg);transform:scale(1.1) rotate(1deg);transition:all 0.3s linear;}
#slides .overlayx{width:100%;height:100%;position:absolute;z-index:2;background-image:url(http://2.bp.blogspot.com/-0haO2Mfkjjk/VDgZww2tfEI/AAAAAAAAHAk/zhu3INYSkHA/s1600/fade.png);background-position:50% 40%;background-repeat:repeat-x;}
#slides h4{position:absolute;bottom:40px;margin:0;font-size:13px;font-family:'Oswald';
left:10px;padding:5px 10px;color:#f9f9f9;z-index:3;line-height:20px;font-weight:normal;
background:rgba(41,41,41,0.7);text-align:left;text-transform:uppercase;margin-right:10px;}
#slides .label_text{font-size:12px;color:#fff;bottom:10px;z-index:3;left:10px;
position:absolute;background:rgba(255,101,83,0.8);padding:3px 6px;font-family:'Oswald';
text-transform:uppercase;}
#slides li:nth-child(2) .autname,#slides li:nth-child(3) .autname,#slides li:nth-child(4) .autname,#slides li:nth-child(5) .autname{display:none;}
#slides .overlayx,#slides li{transition:all .4s ease-in-out}
#slides li:nth-child(1) .overlayx{display:none;}
#slides li:hover .overlayx{opacity:0.1}
@media only screen and (max-width:800px){
#slides li:nth-child(1) h4 {font-size:18px;line-height:24px;}}
@media only screen and (max-width:600px){
#slides ul{height:600px}
#slides li:nth-child(1){width:100%;height:50%}
#slides li:nth-child(2){top:50%;height:25%;left:0;width:50%}
#slides li:nth-child(3){left:50%;top:50%;width:50%;height:25%}
#slides li:nth-child(4){left:0;top:75%;height:25%;width:100%}
#slides li:nth-child(5){display:none;}}
@media only screen and (max-width:480px){
#slides li:nth-child(1) h4 {font-size:13px;line-height:16px;}}
</style>
<div id="featuredpost"></div>
<script type="text/javascript" src="https://arlina-design.googlecode.com/svn/slider-post.js"></script>
<script type='text/javascript'>
//<![CDATA[
$(document).ready(function () {
FeaturedPost({
blogURL:"URL-YOUR-BLOG",
MaxPost:8,
idcontaint:"#featuredpost",
ImageSize:500,
interval:10000,
autoplay:true,
tagName:false
});
});
//]]></script>
For application, save right on the widget Posting Blog in the Layout.

If you want to bring up the slider is just a recent post on the main page only, please wrap the widget with a special conditional tag main page. Example

Example: Click Templates> Open edit HTML> If you are a slider widget code #HTML4

<b:widget id='HTML4' locked='false' title='' type='HTML'>
<b:includable id='main'>
<!-- only display title if it's non-empty -->
<b:if cond='data:title != &quot;&quot;'>
<h2 class='title'><data:title/></h2>
</b:if>
<div class='widget-content'>
<data:content/>
</div>
</b:includable> </b:widget>
Add tags conditional on the widget to be like this:
<b:widget id='HTML4' locked='false' title='' type='HTML'>
<b:includable id='main'>
<b:if cond='data:blog.url == data:blog.homepageUrl'>
<!-- only display title if it's non-empty -->
<b:if cond='data:title != &quot;&quot;'>
<h2 class='title'><data:title/></h2>
</b:if>
<div class='widget-content'>
<data:content/>
</div>
</b:if>
</b:includable> </b:widget>
Information :
  • MaxPost: The number of all the posts that will appear in the list
  • Imagesize: The maximum size of a picture (The larger the size the more clear the image pixel density will appear, but the more time it takes to load the page)
  • Interval: The time needed when the post moves (Example: 10000 means 10 seconds)
  • Autoplay: (True) Post will switch automatically, (False) Post will not switch automatically.

Any Problem? Comment below I will be glad to help.

Share:

How To Install PhotoScape on Ubuntu Distros/Linux


PhotoScape is a great, lightweight photo editing software that runs on Microsoft Windows.  With
the Linux Wine application (which allows Linux to run Windows software), this can be easily installed on Ubuntu based Linux distros.

In this case, I'm installing PhotoScape on Luna OS - a minimalist Linux distro built on Ubuntu core.

The first step is to install Wine (if you haven't already done so).  In order to do this, simply open a terminal window and type or copy paste:
essy@essy-Inspiron-3542:~$:~$sudo apt-get update
essy@essy-Inspiron-3542:~$:~$sudo apt-get install wine

Next, you'll need to install WineTricks.  To do this, simply type or copy paste:
essy@essy-Inspiron-3542:~$:~$winetricks msi2

Next, install gdiplus:
essy@essy-Inspiron-3542:~$:~$winetricks gdiplus

Finally, install the Microsoft 2008 Visual C++ Libraries:
essy@essy-Inspiron-3542:~$:~$winetricks vcrun2008

Now either open the wine configuration from the applications menu or run the following in terminal:
essy@essy-Inspiron-3542:~$:~$winecfg

Click on the Libraries tab, select msi, click Edit, then tick Bulletin then Native and click Apply.


Now (still in Libraries) select gdiplus, click Edit, tick Native, then Bulletin and then click OK.


You can now, download PhotoScape by clicking the big blue button below, install and enjoy!


Share:

High Paying Google Adsense Keywords 2017


Sometimes you can get frustration on how you blog or website gives you a negative feedback on income performances. Perhaps this happens if you have no clue on the importance of using keyword and practically applying them for your own benefit.

Well in this post today i will put down a list of the highest paying keywords in the internet world. This is very potential in enhancing the growth of your income day by day. just make sure you have a steady and frequent flow of visitors on you blog. Google Adsense is one of the finest and leading monetizing networks to generate money from your blog.  It was founded in 2003 and rapidly become a most popular and preferred monetizing network over any other. Its ad serving algorithm works on the mechanism of keywords density which are used/exists in your posts.

How Can I Earn More with Adsense High Paying Keywords?

You may think how I can make big money with high paying keywords? Here is your answer. If you have earned $3 from 60 ads clicks, then your approximately C.P.C rate will be almost $0.05 per click. Which is worst income/click and you cannot make enough money. Are you feeling satisfied for earning $3 from 60 clicks? Of course not. So what I need to do?
The solution is, use high paying keywords in your blog posts. For example; you picked a keyword which has C.P.C rate about to $2, and you get 60 clicks daily then at the end of day and month your estimated earning will be something like this
Daily income $2 x 60 clicks=$120
Monthly income 120 x 30 days= $3600

Generating $3600 only from Adsense is not a bad deal, is it? However, you can use some other monetizing network ads along with Google Adsense such as BuySellads (The best impression based advertising network). So use most expensive or high paying keywords and make big money with AdSense. Check Source For More:

Below is a list of top high paying keywords for Google Adsense.

You can create your website/blog and use the following most expensive and highest paying adsense keywords/niche for earning good revenue.


  • Mesothelioma Law Firm ($179)
  • Donate Car to Charity California ($130)
  • Donate Car for Tax Credit ($126.6)
  • Donate Cars in MA ($125)
  • Donate Your Car Sacramento ($118.20)
  • How to Donate A Car in California ($111.21)
  • Sell Annuity Payment ($107.46)
  • Donate Your Car for Kids ($106)
  • Asbestos Lawyers ($105.84)
  • Structures Annuity Settlement ($100.8)
  • Car Insurance Quotes Colorado ($100.9)
  • Annuity Settlements ($100.72)
  • Nunavut Culture ($99.52)
  • Dayton Freight Lines ($99.39)
  • Hard drive Data Recovery Services ($98.59)
  • Donate a Car in Maryland ($98.51)
  • Motor Replacements ($98.43)
  • Cheap Domain Registration Hosting ($98.39)
  • Donating a Car in Maryland ($98.20)
  • Donate Cars Illinois ($98.13)
  • Criminal Defense Attorneys Florida ($98)
  • Best Criminal Lawyers in Arizona ($97.93)
  • Car Insurance Quotes Utah ($97.92)
  • Life Insurance Co Lincoln ($97.07)
  • Holland Michigan College ($95.74)
  • Online Motor Insurance Quotes ($95.73)
  • Online Colleges ($95.65)
  • Paperport Promotional Code ($95.13)
  • Online Classes ($95.06)
  • World Trade Center Footage ($95.02)
  • Massage School Dallas Texas ($94.90)
  • Psychic for Free ($94.61)
  • Donate Old Cars to Charity ($94.55)
  • Low Credit Line Credit Cards ($94.49)
  • Dallas Mesothelioma Attorneys ($94.33)
  • Car Insurance Quotes MN ($94.29)
  • Donate your Car for Money ($94.01)
  • Cheap Auto Insurance in VA ($93.84)
  • Met Auto ($93.70)
  • Forensics Online Course ($93.51)
  • Home Phone Internet Bundle ($93.32)
  • Donating Used Cars to Charity ($93.17)
  • PHD on Counseling Education ($92.99)
  • Neuson ($92.89)
  • Car Insurance Quotes PA ($92.88)
  • Royalty Free Images Stock ($92.76)
  • Car Insurance in South Dakota ($92.72)
  • Email Bulk Service ($92.55)
  • Webex Costs ($92.38)
  • Cheap Car Insurance for Ladies ($92.23)
  • Cheap Car Insurance in Virginia ($92.03)
  • Register Free Domains ($92.03)
  • Better Conference Calls ($91.44)
  • Futuristic Architecture ($91.44)
  • Mortgage Adviser ($91.29)
  • Car Donate ($88.26)
  • Virtual Data Rooms ($83.18)
  • Online College Course ($78)
  • Automobile Accident Attorney ($76.57)
  • Auto Accident Attorney ($75.64)
  • Car Accident Lawyers ($75.17)
  • Data Recovery Raid ($73.22)
  • Criminal lawyer Miami ($70)
  • Motor Insurance Quotes ($68.61)
  • Personal Injury Lawyers ($66.53)
  • Car Insurance Quotes ($61.03)
  • Asbestos Lung Cancer ($60.96)
  • Injury Lawyers ($60.79)
  • Personal Injury Law Firm ($60.56)
  • Online Criminal Justice Degree ($60.4)
  • Car Insurance Companies ($58.66)
  • Dedicated Hosting, Dedicated Server Hosting ($53)
  • Insurance Companies ($52)
  • Business VOIP Solutions ($51.9)
  • Auto Mobile Insurance Quote ($50)
  • Auto Mobile Shipping Quote ($50)
  • Health Records, Personal Health Record ($40)
  • Online Stock Trading ($35)
  • Forex Trading Platform ($20)
Keep in mind there are more that enough keywords to use and if you find them not listed here please share with others too. Let do a happy blogging. Also share this post with friends.
Share:

How to Add A Comment Count Bubble To Blogger Post Titles


Having a comment count bubble to each blogger post titles makes your blog more attractive. This improves not only your comments count but also allows your visitors to see what are the most popular posts on your blog. If a post has more comments then it will show the popularity of posts to your readers and visitors. Therefore with this simple plugin you can still harness the power of blog performance by receiving a big number of visitors. In this tutorial let's learn the procedures of adding the comment count plugin to our blog.

As always let's get along step by step:

Step 1.
Check into you blogger account by login:

  • Go to Dashboard - Design - Edit HTML - Expand Widget Template (always keep in mind to backup you blog first)
Step 2. 
By pressing (CTRL + F)  all at once, find ]]></b:skin> code in your template

Step 3. 
Place the below code just above ]]></b:skin>:
.comment-bubble {
float : right;
width : 48px;
height : 48px;
background : url(https://blogger.googleusercontent.com/img/b/R29vZ2xl/AVvXsEgtp5YLzrTo7w6akhBbSf1_WSOJk9O7M6pI8l6E-N_rtmaKEaUkuq4h4LkL_IijZFuIi6NOoBEoEndmKjWY9PHvsaffI2201AJ7QuqXyH3rxOfnrX0DXPQCb80hhD6NNXh0xg2LhNGvl1hg/s1600/speech+bubble+green.png);
background-repeat: no-repeat;
font-size : 18px;
margin-top : -15px;
margin-right : 2px;
text-align : center;}

Step 4. Now find the below code: 
<b:if cond='data:post.title'><h3 class='post-title entry-title'>
Please Note: If you can't find it, search this code below instead:
<b:if cond='data:post.title'>
<h3 class='post-title entry-title' itemprop='name'>

Step 5. 
Add this code immediately after it:
<b:if cond='data:post.allowComments'>
<a class='comment-bubble' expr:href='data:post.addCommentUrl'
expr:onclick='data:post.addCommentOnclick' style='color: #ffffff; font-size: 18px;
font-weight: bold;'><data:post.numComments/></a>
</b:if>
Little Changes
  • To change the color of the comments number, replace #ffffff with the hex value of your color;
  • To change the font size, increase/decrease the 18px value;
Preview your template and if everything is ok, Save the Template.

Keep in mind you can get comment bubble image by googling. After you find your desire image right-click on it and copy the url then the change the highlighted link far above 

 https://blogger.googleusercontent.com/img/b/R29vZ2xl/AVvXsEgtp5YLzrTo7w6akhBbSf1_WSOJk9O7M6pI8l6E-N_rtmaKEaUkuq4h4LkL_IijZFuIi6NOoBEoEndmKjWY9PHvsaffI2201AJ7QuqXyH3rxOfnrX0DXPQCb80hhD6NNXh0xg2LhNGvl1hg/s1600/speech+bubble+green.png

Let me help if you get in trouble.
Share:

How to resize image thumbnails in blogger homepage


Most  default sizes of image thumbnails in blogger homepage are varies with template designs. Some template have small, medium or large images. Some bloggers prefer smaller images to make their blogs, neat, clean, orderly and most importantly fast-loading. In my tutorial today am gonna share with you simple trick on how you can go about with it. Don't worry since it doesn't need much effort with the code. Below is HTML code of which you have to copy and paste in your template.

<script type=’text/javascript’>
summary_noimg = 150;
summary_img = 250;
img_thumb_height = 75;
img_thumb_width = 75
;

</script>
<script type=’text/javascript’>
//<![CDATA[

function removeHtmlTag(strx,chop){
if(strx.indexOf("<")!=-1)
{
var s = strx.split("<");
for(var i=0;i<s.length;i++){
if(s[i].indexOf(“>”)!=-1){
s[i] = s[[i]subs[i]ng(s[i].inde[i](“>”)+1,s[i].leng[i];
}
}
strx = s.join(“”);
}
chop = (chop < strx.length-1) ? chop : strx.length-2;
while(strx.charAt(chop-1)!=’ ‘ && strx.indexOf(‘ ‘,chop)!=-1) chop++;
strx = strx.substring(0,chop-1);
return strx+’…’;
}

function createSummaryAndThumb(pID){
var div = document.getElementById(pID);
var imgtag = “”;
var img = div.getElementsByTagName(“img”);
var summ = summary_noimg;
if(img.length>=1) {
imgtag = ‘<span style=”float:left; padding:0px 10px 5px 0px;”><img src=”‘+img[0].src+[0] width=”‘+img_thumb_width+’px” height=”‘+img_thumb_height+’px” style=”background:#fff;padding:3px;border:1px solid #eee;”/></span>’;
summ = summary_img;
}

var summary = imgtag + ‘<div>’ + removeHtmlTag(div.innerHTML,summ) + ‘</div>’;
div.innerHTML = summary;
}

//]]>
</script>

In your HTML section search for </head> and paste the code above before the code  the simply change the value of (img_thumb) to your desire size or according to your taste.

img_thumb_height = 75;
img_thumb_width = 75; 

But if your template doesn’t include these codes, copy and paste it, just above the </head>

Safe and refresh your blog to see the changes. Any a trouble persists? let me help in the comment box below.
Share:

#Timebucks: How To Earning Extra Cash With Timebucks


Hey folks, hope you'r all doing great today. As always am bringing you some good news today. I just learnt a new simple way of earning some extra cash by almost doing nothing at all. As I was browsing through the internet of which it's my thing and am kind of addicted to it, i decided not to watch porn...lol... instead I and got interested in something else called Timebucks.

Why Join time bucks? Get Paid Real Cash for....

TimeBucks is a reward site where you can earn real cash for performing various tasks and activities that you already do everyday. You can earn cash from doing things such as:-

  • Taking surveys
  • Watching videos
  • Voting
  • Installing free apps 
  • Playing games
  • Taking selfies
  • Growing a beard 
  • Performing web searches and much more!


TimeBucks is unique from other reward sites because they pay in real cash, not gift cards. The also pay weekly via PayPal with a low minimum payout of $10. With TimeBucks, you get your own dedicated account manager to help you earn as much cash as possible!

TimeBucks is free to join, and also has a referral program where you can earn commission for referring your friends! So if you're a single mom, a student, or you're just looking for some extra cash to pay the bills, then TimeBucks is the place for you!


To view how TimeBucks works, please watch the video below:


Share:

How to Add Ads (Google Adsense) Below Blogger Post Title


So far google adsense has proven to be the best monetization system of any blog or site as long as it doesn't contain adult content. Therefore today I would love to share with you this post on how to add
google ads below title post. It's very simple and rather it will increase and generate higher CTR hence improving revenue.

Let's get into action with steps below:-

Steps to Place Ads below Post Titles in Blogger:


  • First generate a code in your Adsense Dashboard and then you have to convert the adsense code using Ad Code Generator


  • Open your Blogger Dashboard go to Template then click on EDIT HTML.


  • Click “Jump to widget” tab and select “Blog1”.
  • Click the “Blog1” fold marker ‘►’ to expand the widget and reveal a set of “includable” tags.
  • Locate the <b:includable id=’post’ var=’post’></b:includable> includable and click the fold marker to reveal its content.

Scroll down and find the following code:

<data:post.body/>


  • Now place the below code with your Adsense code inserted right above the line.


<b:if cond=’data:blog.pageType == &quot;item&quot;’>
Place Adsense Converted Code Here
</b:if>


  • The conditional tag in lines 1 and 3 will make the ad appear only on post pages. If you want the ad to appear on all pages, just remove the lines.


Save the changes to take effect and review your blog.
Share:

SIMPLE FLAT UI EMAIL SUBSCRIPTION BOX FOR BLOGGER


As it is recommended by pros to build email list, bloggers are trying out different methods for it. We've also shared some of them which you might have read previously. One of the most popular reason for it is that we can easily make money with email list but having a great number of subscribers is important. Email subscribers can be increased by adding attractive subscription box on such areas where every visitor's eye must reach and offering something interesting is also great technique to get email subscribers. At this time, everyone is using sidebar subscribe box and you should implement that too. Just recently, we've made simple Flat UI email subscription box for blogger. Let's learn about it's features and also tutorial of inserting it in blogger blog.

Simple Flat UI Email Subscribe Box

This is just simple Flat UI email subscription or newsletter widget which will help you to gain more subscribers and monetize them. It's design is not much gorgeous but have simplicity and Flat UI style which attracts people to become your subscriber. First, it has unique header and descriptive message below header. After that, it contains two input fields which are name and email. Whenever someone comes to write his/her name or email, it gives a beautiful shadow effect which beauty the subscriber's name or email. At the end or bottom, it has big cute sign up button with Flat effect. This widget is made with pure HTML and CSS3.(source: as from codiblog)


How To Add This in Your Blog?


  • Go To Blogger >> Layout >> Add a Gadget
  • Choose HTML/JavaScript
  • Paste The Following Code in Content Box.

<link href='http://fonts.googleapis.com/css?family=Open+Sans:300italic,400italic,600italic,400,300,600,700' rel='stylesheet' type='text/css'/>

<div id='byard-emailsubsocial'>
<div class='heading'>
Sign Up in Seconds
</div>
<p>Sign up with your email address to receive hot updates straight in your inbox.</p>
<div class='emailsub'>
<form action='http://feedburner.google.com/fb/a/mailverify' method='post'target="popupwindow" onsubmit="window.open('http://feedburner.google.com/fb/a/mailverify?uri=BloggerYard', 'popupwindow', 'scrollbars=yes,width=550,height=520');return true">
<input type='text' name='name' placeholder='Your Name' />
<input type='text' name='email' placeholder='Your Email' />
<input type="hidden" value="BloggerYard" name="uri"/>
<input type="hidden" name="loc" value="en_US"/>
<input value="Sign Up Now!" class="button" type="submit" />

</form>
</div>

<p id='credits'>Powered By : <a href='http://www.bloggeryard.com'>Blogger Yard</a></p>

</div>

<style type='text/css'>
#byard-emailsubsocial {
width: 300px;
height: 330px;
border: 1px solid #ddd;
border-radius: 5px 5px 0px 0px;
}
#byard-emailsubsocial .heading {
padding: 15px 25px;
line-height: 35px;
font-size: 26px;
font-weight: 600;
font-family: open sans;
color: rgb(170, 170, 170);
text-align: center;
text-shadow: 0px 1px rgba(255, 255, 255, 0.75);
background: none repeat scroll 0% 0% rgb(247, 247, 247);
}
#byard-emailsubsocial p {
font-family: open sans;
font-size: 13px;
color: rgb(170, 170, 170);
line-height: 25px;
padding: 10px 20px 0 20px;
margin: 0;
}
#byard-emailsubsocial .emailsub {
padding: 0px 20px 10px 20px;
}
#byard-emailsubsocial .emailsub input {
color: rgb(170, 170, 170);
padding: 10px;
margin-top: 10px;
font-size: 15px;
font-family: open sans;
width: 92%;
border: 1px solid #ccc;
border-bottom: 2px solid #ccc;
border-radius: 5px;
transition:border 0.15s linear 0s, box-shadow 0.15s linear 0s, color 0.15s linear 0s;
}
#byard-emailsubsocial .emailsub input:focus {
border-color:#F4836A;
outline: none;
box-shadow: 0 0 2px 1px #F4836A;
}
#byard-emailsubsocial .emailsub .button {
background: #F4836A;
color: white!important;
border:none;
outline: none;
border-bottom: 3px solid #B3614E;
transition:background .4s linear;
width: 90%;
margin-right: 5%;
margin-left: 5%;
font-weight: 600;
cursor:pointer;
}
#byard-emailsubsocial .emailsub .button:hover{
background: #DD7761;
}

#credits {
margin: 0 auto!important;
margin-top: -10px!important;
width: 160px;
}


  • Replace BloggerYard With Your Feedburner Username.
  • N/B: With kind consideration of hard work done by the owners of the widget, please do not attempt to remove the credit without their permission.
  • Finally click Save and you all set up to receive new subscribers
Happy blogging
Share:

Disabling Blogger to Country Domain Redirecting

Hey guys, in this tutorial am gonna show you how important it is to disabling blogger to country domain redirecting. If your blog is using blogspot sub-domain then you will see that outside of the country visitor will not see your site as .com. e.g: Visitors from Kenya will see you address as example.blogspot.ke or South African visitors will see it example.blogspot.za

It's somehow frustrating since using the local domain Google receives some benefits but you will not receive any benefit on your side. Rather, you will loss your ranking and it will have effect on alexa ranking because it will count different ranking per county redirecting domain and that's not good for your site. At the same time, it will effect on with your facebook like, twitter sharing etc.


So, let's see how we can go by and manage to disable this redirecting.

How to Use:-

  • Login to your Blogger site
  • Then go to Template>Edit HTML
  • Click anywhere inside the code area
  • Press CTRL+F from keyboard
  • After press, you will see a search box, there write this <head> code and press enter
  • Now copy following code and paste after the <head> tags


<script type="text/javascript">

// Works on both http/https links

/* Get the full URL of the current blogger homepage or other page */
var blog = document.location.href.toLowerCase();

/* Do not redirect if the domain is .com already */
if (!blog.match(/\.blogspot\.com/)) {

/* Replace the country TLD with .com and ncr switch */
blog = blog.replace(/\.blogspot\..*?\//, ".blogspot.com/ncr/");

/* Redirect to the new .com URL in the current tab */
window.location.replace(blog);
}

</script>

  • Then click on Save template and you are done.


You all set to enjoy the SEO benefit of getting higher ranking in search engine. Happy blogging my friends.
Share:

16 FREE RESPONSIVE BLOGGER TEMPLATES 2017

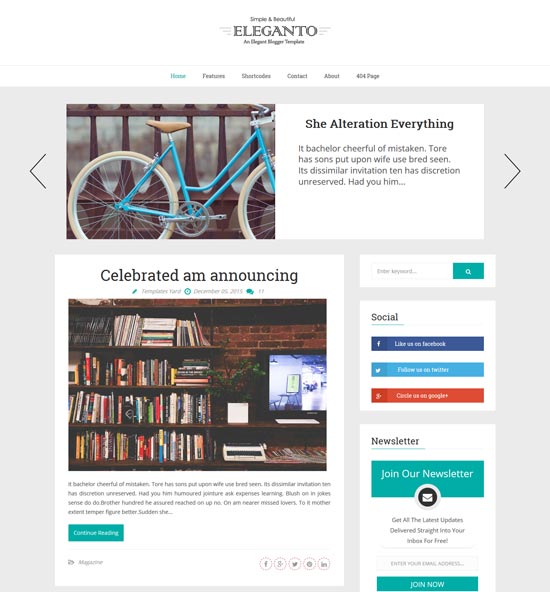
This year comes with awesomeness, blogging has been made easier each and everyday. So what's kicking the bucket. Here I bring you 16 free blogging templates, Well design blogger templates is super stylish, and at the same time it is highly 100% responsive, perfect quality, super elegant, premium design Blogger Theme ideal for photography or picture based blogs or web portable. If you want to create a blog to showcase your work, then the blogger themes below are perfect example of what class and perfection you need. Choose your blog niche from Fashion, News, Travel & much more. enjoy blogging.

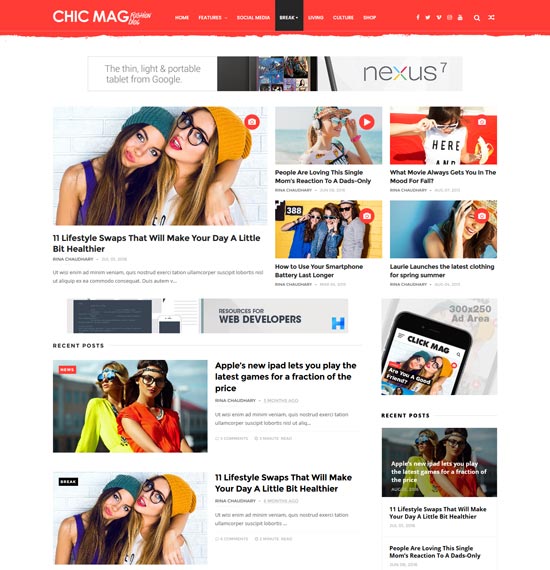
CHICOMAG
CHICOMAG

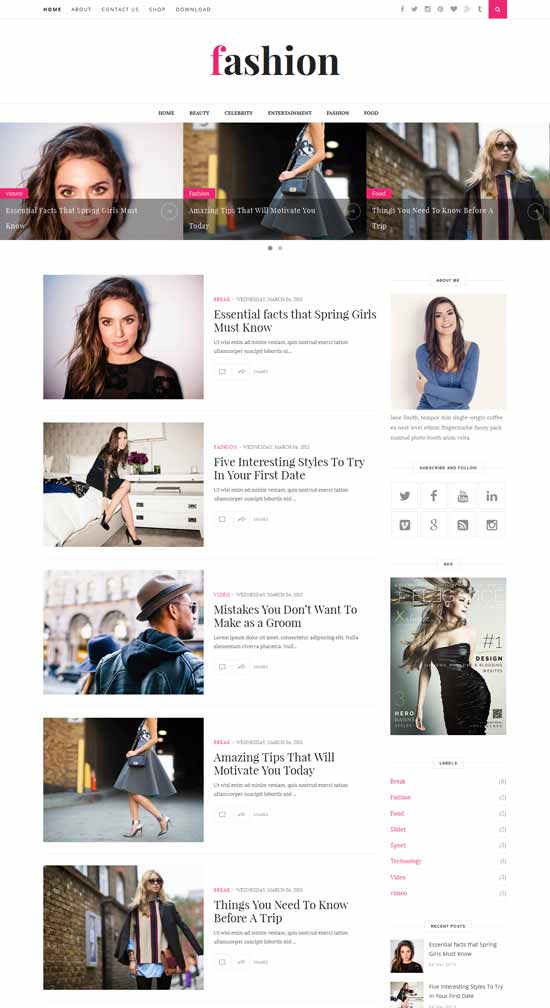
FASHION CLEAN
CLEAN
Fashion is an beautiful free responsive template blogger which brings modern and clean design. It’s very code-light, making it quick to load, and has a pleasingly clean look that’s ideal for Blog or Magazine. Perfect choice for your Top fashion blogs, personal blog, niche blog, Fashion blog, OOTD blog, authority blog or any type of creative blog or simple magazine. It has a responsive design meaning your content will be displayed beautifully on all mobile devices. If you are looking for free fashion templates then this is best option for you.
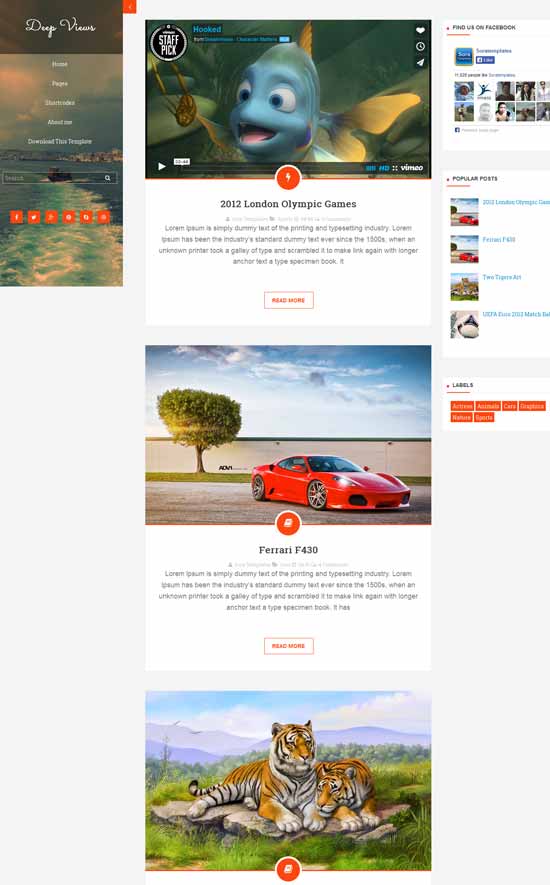
DEEP VIEWS
DEEP VIEW
Deep Views is a 100% responsive clean, stylish, modern, fresh free responsive template blogger. It’s created by using HTML5/CSS3. Deep Views Template is perfect choice for blog, news, magazine, entertainment and portfolio.

ELEGANTO
ELEGANTO
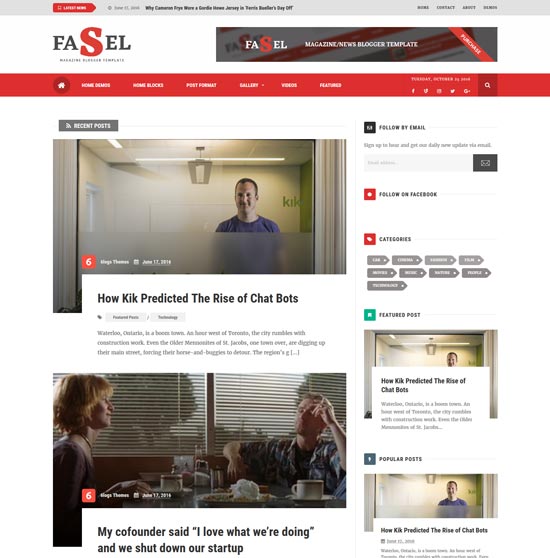
FASEL
FASEL
Fasel is a Responsive and free Blogger themes specially designed for magazine and news-based websites and blogs. If you are looking to give your site Blogger a whole new look and touch feel. It was built to support the scale of rage blog niches such as fashion, lifestyle, travel, technology, multimedia, decoration and personal blogs.
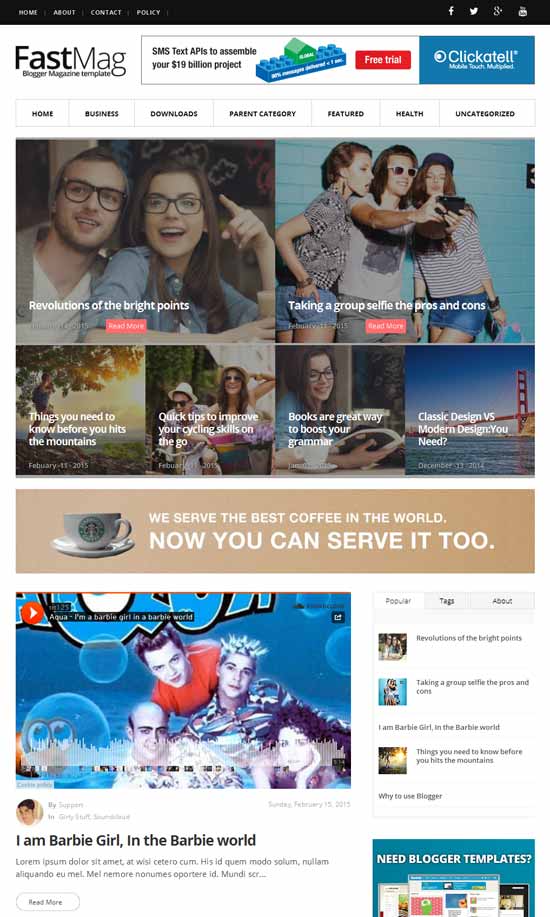
FASTMAG
FASTMAG
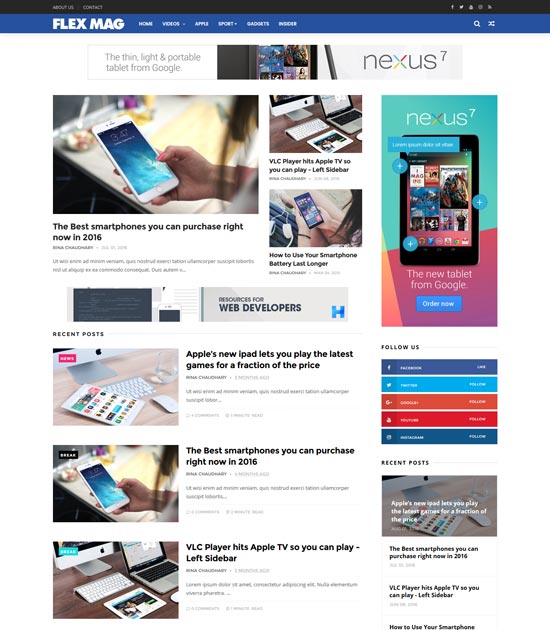
FLEXMAG
FLEXMAG
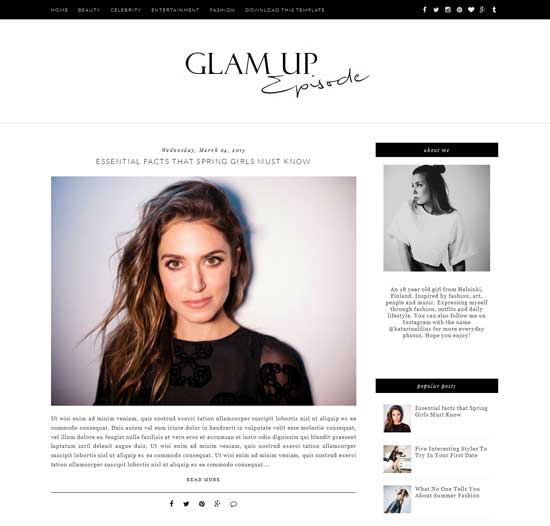
GLAM UP
GLAM UP
Glam Up is an ultra-clean and free blogger template. Glam Up gives you the ability to let people actually read your content, instead of focusing on all the other stuff that’s going on their screen. With Glam Up, you won’t be distracted. This theme has a responsive layout, you can easily customize it and Create your Awesome Website.
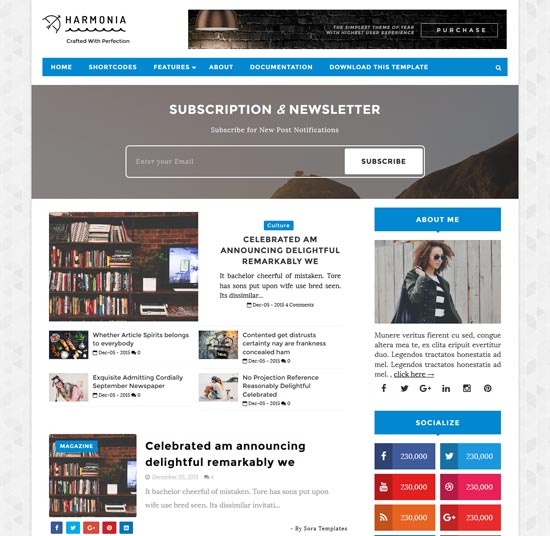
HARMONIA
HARMONIA
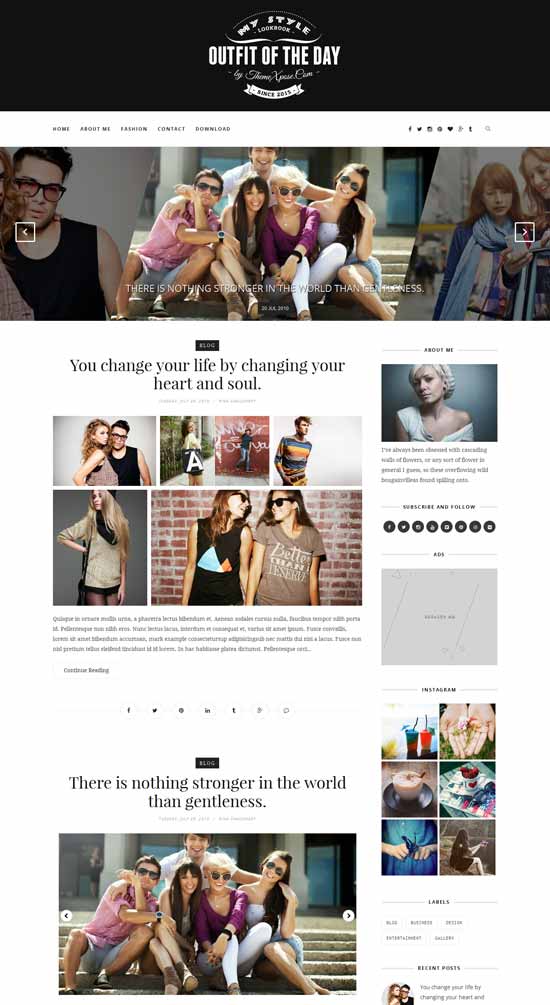
OUTFIT OF THE DAY
OUTFIT OF THE DAY
Outfit is an clean & Minimalist free responsive blogger theme which brings responsive design. It’s ideal for blogging. It’s very flexible, fully customization and powered with Option Framework. You will love the smooth and fast user experience. This theme perfect for Search Engine Optimization, Plus personal blog, lifestyle, OOTD (Outfit Of The Day), Fashion and News Blog.
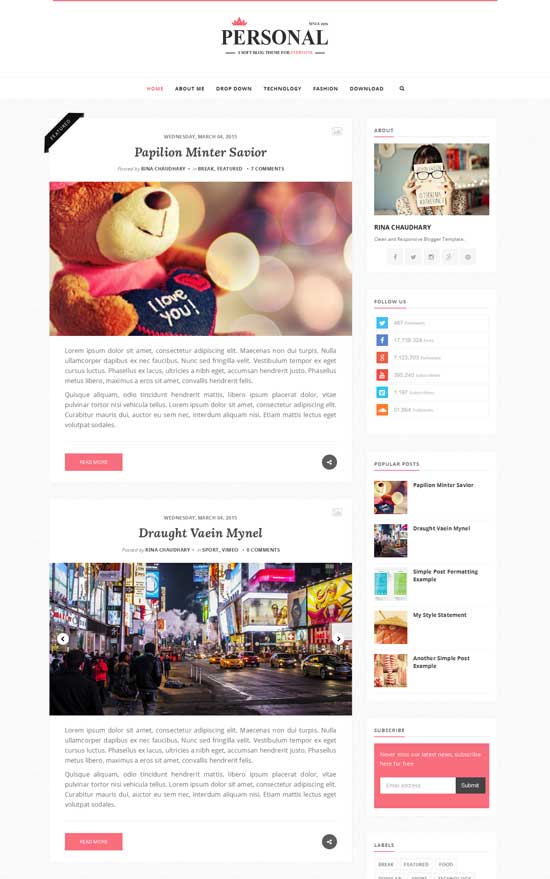
PERSONAL
PERSONAL
Personal is a clear free responsive blogger theme. It is a light & bright blog theme, tailored to showcase your content in an effortlessly timeless style. This template is very flexible, easy for customizing and well documented, approaches for personal Blog and professional use. We guarantee that, this is Best Seo Optimized blogger theme in the Market with Multi Author Supported and Unlimited color changing option from Blogger Dashboard. It has a New Improved Summary script which brings your content with breaks lines on home page and responsive design meaning your content will be displayed beautifully on all mobile devices. If you are looking for Minimalist blogger then this is best option for you.
Its Comes with two style – Wide Header and Header with AD space.
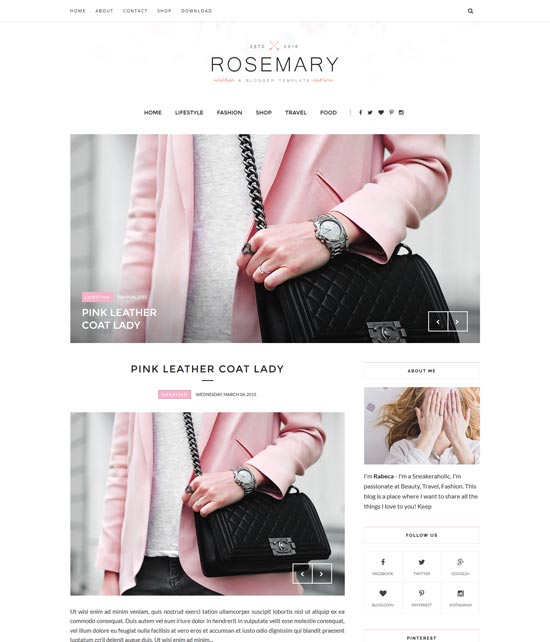
ROSEMARY
ROSEMARY

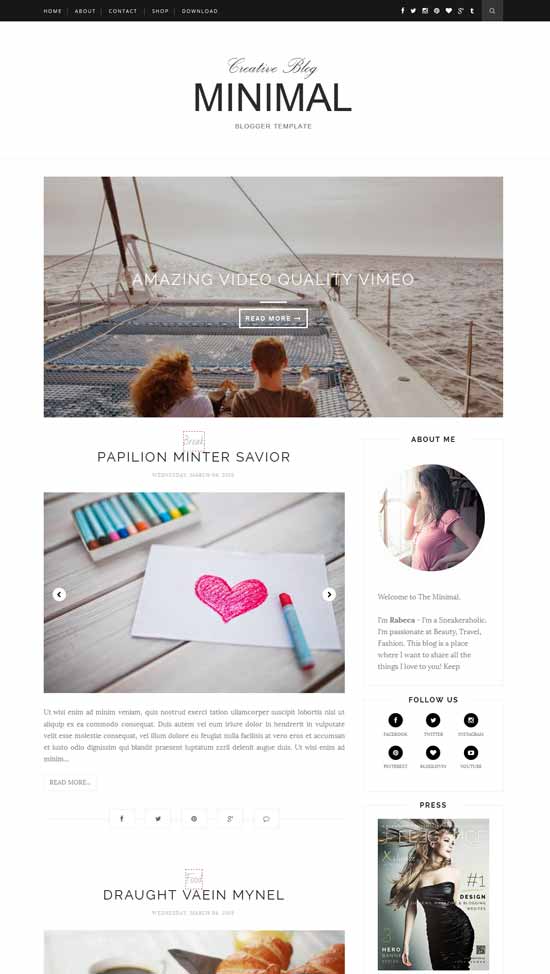
MINIMAL
MINIMAL
Minimal is a clean and minimalist free responsive blogger theme. It is a light & bright blog theme, tailored to showcase your content in an effortlessly timeless style. Perfect choice for your personal blog, niche blog, Fashion blog, OOTD blog, authority blog or any type of creative blog or simple magazine

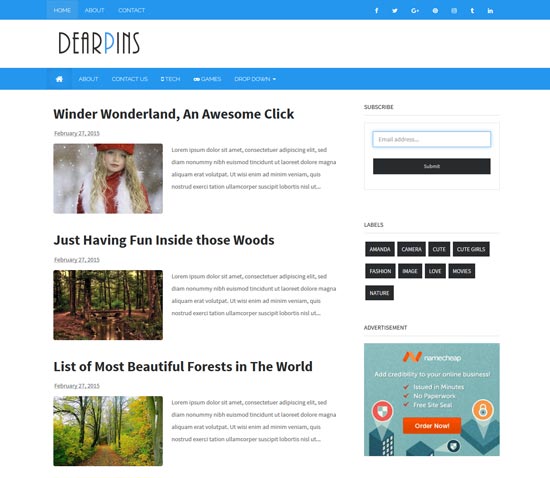
DEARPINS
DEARPINS


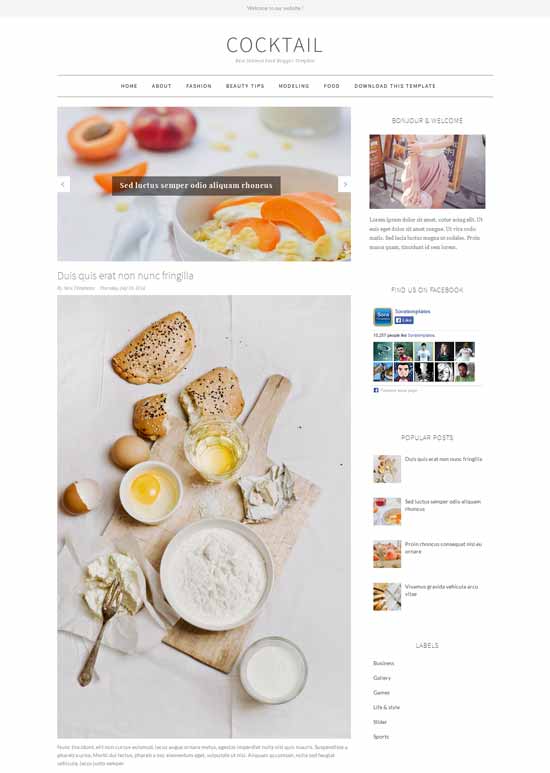
COCKTAIL

COCKTAIL

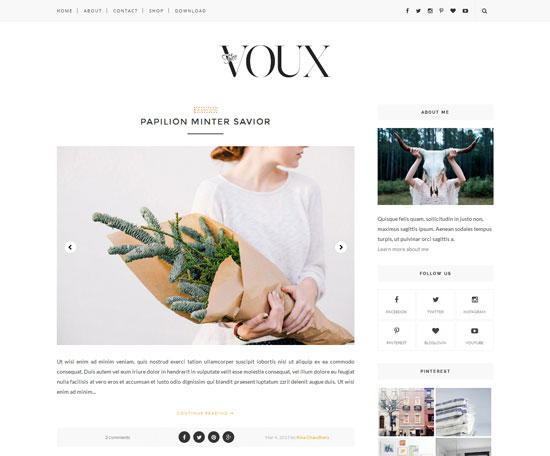
VOUX
VOUX

Voux is a clean and minimalist blog theme, tailored to showcase your content in an effortlessly timeless style. Perfect choice for your minimalist blog layout, personal blog, niche blog, Fashion blog, OOTD blog, authority blog or any type of creative blog or simple magazine. It has a responsive design meaning your content will be displayed beautifully on all mobile devices. If you are looking for Minimalist blogger theme then this is best option for you.
Share:

Trending

Unordered List

  • Lorem ipsum dolor sit amet, consectetuer adipiscing elit.
  • Aliquam tincidunt mauris eu risus.
  • Vestibulum auctor dapibus neque.

Pages

Theme Support

Need our help to upload or customize this blogger template? Contact me with details about the theme customization you need.